My apologies, here's a really blurry photo of me wearing them. I seemed to have deleted the good photo! Oh well.
And, a beautiful woven cloth I was rewarded with from Missouri Trouble! It sits perfectly on my bedside table. It's a cotton and linen blend and the pattern is called Fig Leaf. Jenny wove a series of these mats in tribute to one of her weaving mentors, who before she died, had asked the weaving group to explore the pattern in memory of her. It's so nice to hear the stories that may be behind what people create.Thursday, September 24, 2009
my berry stained hands
The last time I was at Webs I got some Berroco Comfort DK for swatching. When the fall weather arrived, I thought the yarn would be great for transitional fingerless gloves. They're not too hot for this time of year, are stretchy yet keep their shape well, and are just fun to wear. I didn't use a pattern. Using a F/3.75 hook, I just made a long enough chain to fit my hand, joined it for working in the round, then went round and round single crochet through the back loops, skipped some stitches and made some chains for the thumb hole, and continued round. I still have a good amount of yarn left for swatching.
Monday, September 07, 2009
Sunday's Rosy Hue
Made while watching the US Open. Elsebeth Lavold Hempathy, 2.75 mm hook. The stunning cloth underneath was a handwoven gift from my sister, Jenny.
Saturday, September 05, 2009
Crocheting the edge of the Comet
Here's a few tips if you're uncertain about how to slip stitch the edge of the Comet cuff.
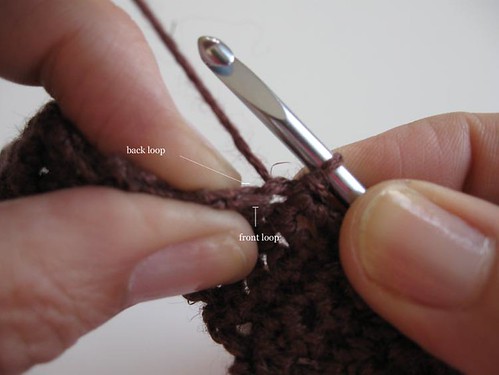
Step 1: You'll notice some stitches along the edge look like the one below in the photo - a clearly defined crochet stitch. You should slip stitch through the back loop, which really means insert the hook in between the front and back loops to complete the slip stitch.
Step 1: You'll notice some stitches along the edge look like the one below in the photo - a clearly defined crochet stitch. You should slip stitch through the back loop, which really means insert the hook in between the front and back loops to complete the slip stitch.
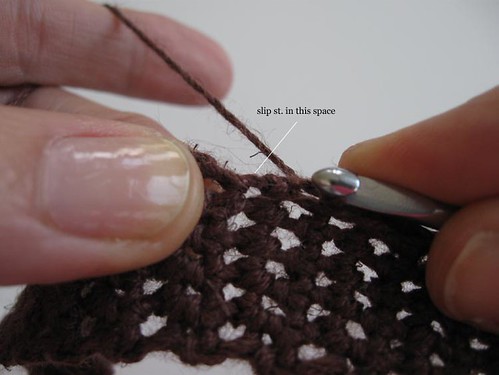
Step 2: The next stitch will look like a tighter, smaller space, and it won't look like a regular crochet stitch with front and back loops. Just slip stitch in this space.
Step 3: The next stitch will again look like the usual crochet stitch with front and back loops. Again, slip stitch through the back loop. Continue in this manner, which will alternate between slip stitching through a back loop, then slip stitching through the next space. Slip stitching through the back loops makes the edge lay more along the side of the cuff, and I think gives the cuff a neater appearance. Slip stitches through both loops makes the slipped edge lay more on the top of the cuff.
Subscribe to:
Comments (Atom)


